Image ChatGPT Image 2.5
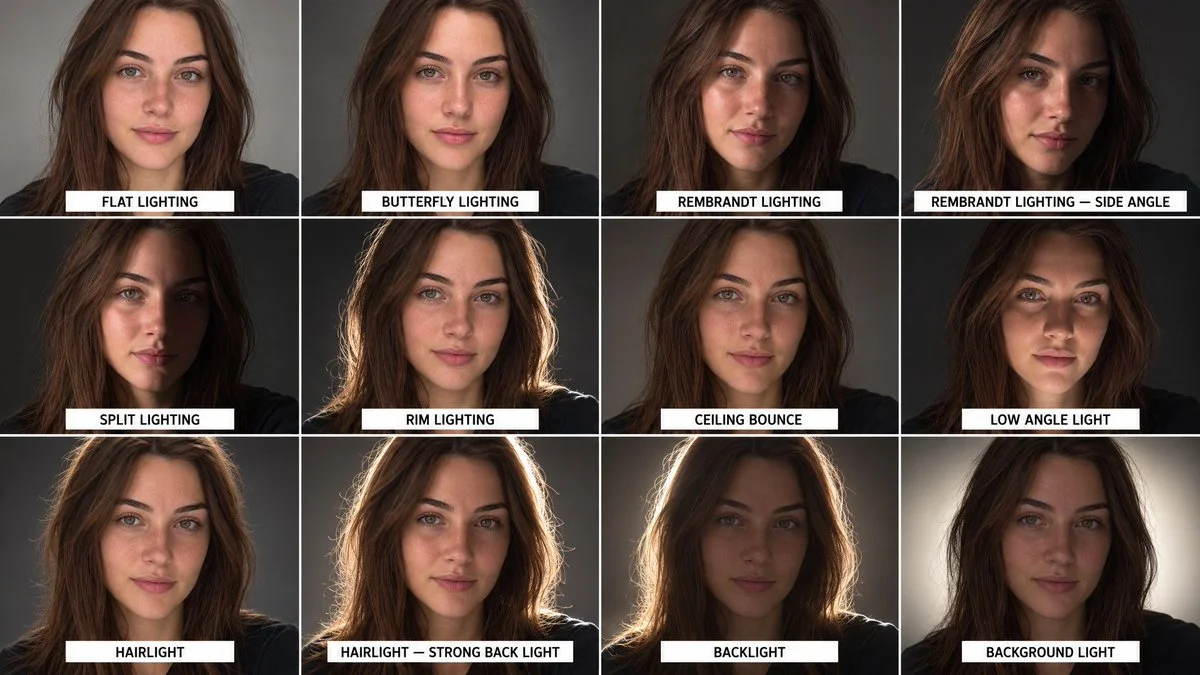
Twelve-Panel Portrait Grid Shows Identical Face Under Varied Studio Lights
A 4x3 grid of the same person under 12 studio setups—flat, butterfly, Rembrandt, split, rim—preserving exact facial identity.
Prompt
Create an ultra-photorealistic professional 12-panel portrait lighting reference sheet using the uploaded character reference image as the ONLY source for the character's identity.

CHARACTER IDENTITY — STRICT LOCK:

Use the uploaded character reference to preserve the EXACT same person in every single panel.

Preserve:

- exact facial identity

- facial structure

- facial proportions

- eyes

- eyebrows

- nose

- lips

- jawline

- cheekbones

- chin

- ears

- skin tone

- hairline

- hairstyle

- age appearance

- all distinctive facial characteristics

The character must remain IDENTICAL across all 12 portraits.

Do NOT redesign the face.

Do NOT beautify or reshape the face.

Do NOT change facial proportions.

Do NOT create different people.

Do NOT change hairstyle or clothing.

The ONLY major variable between panels is the LIGHTING SETUP.

==================================================

12-PANEL LIGHTING REFERENCE SHEET

==================================================

Create exactly 12 equal portrait panels arranged in a clean 4 × 3 grid.

Every panel shows the SAME character in the SAME:

- front-facing head-and-shoulders pose

- camera angle

- facial expression

- crop

- hairstyle

- clothing

- body position

Only the lighting changes.

Use a clean professional studio background with consistent framing.

Each panel must have a clear readable label at the bottom.

Panel order:

1. FLAT LIGHTING

2. BUTTERFLY LIGHTING

3. REMBRANDT LIGHTING

4. REMBRANDT LIGHTING — SIDE ANGLE

5. SPLIT LIGHTING

6. RIM LIGHTING

7. CEILING BOUNCE

8. LOW ANGLE LIGHT

9. HAIRLIGHT

10. HAIRLIGHT — STRONG BACK LIGHT

11. BACKLIGHT

12. BACKGROUND LIGHT

==================================================

1 — FLAT LIGHTING

==================================================

Use soft frontal light directly facing the character.

Very even illumination across the entire face.

Minimal shadows.

Very little facial contrast.

Both sides of the face similarly illuminated.

Natural, clean, neutral appearance.

This panel should clearly demonstrate what flat lighting looks like.

==================================================

2 — BUTTERFLY LIGHTING

==================================================

Place the main key light directly above and slightly in front of the character.

Create the classic small butterfly-shaped shadow beneath the nose.

Soft shadow beneath the chin.

Forehead, cheeks and upper face remain beautifully illuminated.

Elegant beauty/fashion portrait lighting.

==================================================

3 — REMBRANDT LIGHTING

==================================================

Place the key light approximately 45 degrees to one side and slightly above eye level.

Create the recognizable small triangular patch of light on the shadow-side cheek beneath the eye.

One side of the face is illuminated while the other side falls into controlled shadow.

Cinematic, dimensional portrait appearance.

==================================================

4 — REMBRANDT LIGHTING — SIDE ANGLE

==================================================

Use a stronger side-oriented Rembrandt setup.

Increase directional contrast compared with Panel 3.

Create deeper facial shadows while maintaining the characteristic triangular cheek highlight.

Clearly show how changing the light position alters the Rembrandt effect.

==================================================

5 — SPLIT LIGHTING

==================================================

Place the key light approximately 90 degrees to one side of the character.

One half of the face should be strongly illuminated.

The opposite half should fall into noticeable shadow.

Create a clear vertical division of light and darkness across the face.

High-contrast dramatic portrait lighting.

==================================================

6 — RIM LIGHTING

==================================================

Place a strong light behind and slightly to the side of the character.

Create a bright thin highlight/rim around the outer edges of the hair, shoulders and silhouette.

Keep the face primarily illuminated by a softer subtle frontal fill.

The purpose is to clearly demonstrate subject separation from the background.

==================================================

7 — CEILING BOUNCE

==================================================

Place the primary light above the character and bounce it downward from a ceiling/overhead reflector.

Create soft downward illumination.

Subtle shadows underneath the eyebrows, nose and chin.

Natural dimensionality without harsh contrast.

Clearly demonstrate overhead bounced lighting.

==================================================

8 — LOW ANGLE LIGHT

==================================================

Place the key light below the character's face, pointing upward.

Create upward-facing illumination with unusual shadows under the cheekbones, nose and brow.

The effect should be visibly different from normal portrait lighting.

Keep it photorealistic and physically believable.

==================================================

9 — HAIRLIGHT

==================================================

Place a controlled light above and behind the character.

Create visible highlights across the top and edges of the hair.

The face remains relatively softly illuminated.

The purpose is to clearly demonstrate how a dedicated hair light separates and defines the hairstyle.

==================================================

10 — HAIRLIGHT — STRONG BACK LIGHT

==================================================

Use a stronger rear/top hair light.

Create pronounced bright highlights along the hair silhouette and individual hair strands.

Keep the facial lighting comparatively subdued.

The difference from Panel 9 must be clearly visible.

==================================================

11 — BACKLIGHT

==================================================

Place the primary light directly behind the character.

Create a strong illuminated halo/rim around the silhouette.

The front of the character becomes significantly darker.

Maintain enough subtle fill to preserve some facial detail while clearly demonstrating backlighting.

==================================================

12 — BACKGROUND LIGHT

==================================================

Illuminate the background separately while keeping the character comparatively less illuminated.

Create a visible pool/gradient of light behind the character.

The background should become brighter around the subject, creating clear subject-background separation.

The lighting effect must be visibly different from Panel 11.

==================================================

STRICT CONSISTENCY RULE

==================================================

ALL 12 panels must show THE SAME EXACT CHARACTER.

Do not alter:

- identity

- face

- facial proportions

- hairstyle

- clothing

- expression

- pose

- camera position

- camera focal length

- framing

ONLY change:

- light direction

- light position

- light intensity

- shadow placement

- highlight placement

- contrast

- background illumination where specified

The purpose of the image is to visually teach and demonstrate the difference between professional portrait lighting setups.

==================================================

VISUAL PRESENTATION

==================================================

Create a clean professional lighting-reference chart.

4 columns × 3 rows.

12 equal portrait panels.

Consistent spacing.

Clean studio presentation.

Each portrait centered.

Each label placed in a small clean white label box at the bottom of its panel.

Labels must read exactly:

FLAT LIGHTING

BUTTERFLY LIGHTING

REMBRANDT LIGHTING

REMBRANDT LIGHTING — SIDE ANGLE

SPLIT LIGHTING

RIM LIGHTING

CEILING BOUNCE

LOW ANGLE LIGHT

HAIRLIGHT

HAIRLIGHT — STRONG BACK LIGHT

BACKLIGHT

BACKGROUND LIGHT

No additional text.

==================================================

PHOTOREALISM

==================================================

Ultra-photorealistic professional studio photography.

Realistic skin pores.

Natural skin texture.

Realistic eyes.

Realistic hair strands.

Physically accurate light falloff.

Natural shadows.

Realistic highlights.

Professional portrait photography.

High dynamic range.

Accurate human anatomy.

No plastic skin.

No artificial face.

No cartoon.

No illustration.

No CGI appearance.

OUTPUT:

16K ultra-high-resolution.

Target resolution: 15360 × 8640 pixels.

Approximately 132.7 million pixels.

Maximum possible detail and sharpness.

The final image must function as a professional visual reference showing exactly how the SAME character looks under 12 different portrait lighting setups.
Published: September 11, 2026 by M. Asif